
Start with the display’s usable area
Open Window Me This, choose the portrait display in the monitor map, and select Design layout…. The preview follows the selected work area’s proportions. Give the design a name that will be easy to recognize later, such as “Portrait desk.”
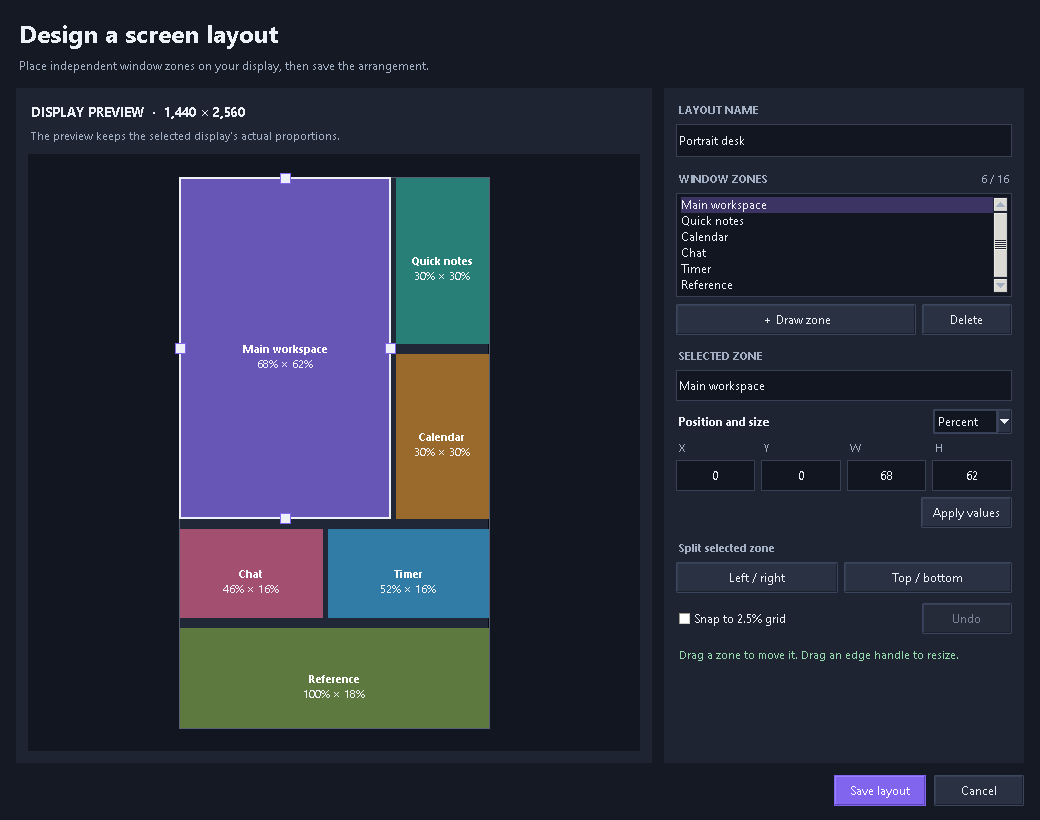
A zone is a rectangular area where a tab group can live. You can leave gaps between zones; they do not need to cover every pixel. The example above uses six named areas: a broad main workspace, two smaller areas on its right, a pair lower down, and a full-width reference strip.
After deployment, a section can also hold parent tabs such as Work and Personal. Those named groups share the zone, so selecting another parent tab changes which group of window tabs appears there without changing the layout geometry.
Shape the zones around your work
Start with one large zone, then select it and choose Left / right or Top / bottom to split it. Use Draw zone to add a rectangle in an open gap. Drag a zone to move it or drag a shared edge handle to resize neighboring areas. The designer supports up to 16 named zones, so a few clear regions are often easier to use than filling the screen with tiny slots.
For a tall display, a useful starting point might be a large upper workspace, two narrow side areas for notes or a calendar, and a lower strip for reference material. In the included 1,440 × 2,560 example, the main workspace is 68% wide and 62% high; the right-hand Quick notes and Calendar zones are each 30% by 30%. These are visible example values, not a required preset.
Enter precise positions or sizes
Select a zone and edit its X, Y, W, and H fields. Choose Percent for proportional measurements or pixels when you have a specific size in mind. Percentages describe how much of the work area a zone uses; pixel values are useful when a tool needs a particular amount of room. Turn on Snap to use a 2.5% grid, and use Undo if a move or resize goes the wrong way.
Check the labels as you work. A name such as “Main workspace,” “Quick notes,” or “Reference” makes it easier to decide which windows belong in each zone after the design is saved.
Save first, then prepare and deploy
Select Save layout after editing. Saving commits the numeric fields and stores the design as a draft; it does not move windows. Return to the manager, open My layouts, and choose Use layout to prepare that design for the selected display. Drag windows from Open windows into their zone cards, or select rows there and choose that card’s + Add selected button. When the arrangement looks right, select Deploy new groups for a first deployment or Apply layout if the display already has groups.
Empty zones can stay in the design for later. If you move a group after deployment, use Reapply layout to put its area back in place. To change the design later, choose Edit in My layouts; New copy makes a separate version.